
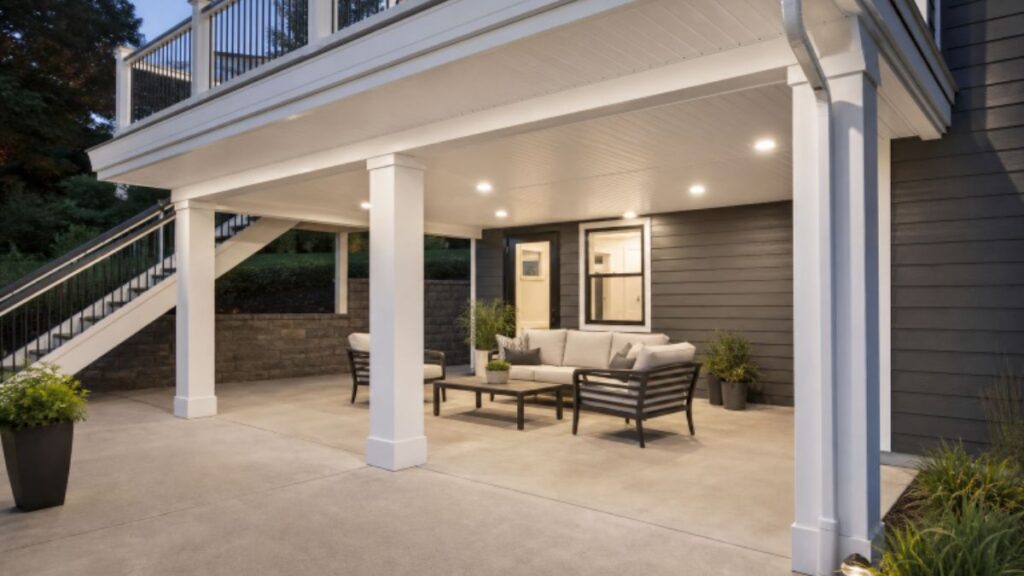
The space beneath a raised deck can become one of the most useful parts of a home, whether it serves as a shaded lounge, an outdoor dining area, a play space, or a protected storage area. The difference between a space that stays inviting and one that feels damp, dark, and unfinished usually comes down to planning water control before selecting furniture or finishes.
For homeowners considering under deck roofing systems Greenville SC, RainOut Underdeck Solutions offers fully custom under-deck ceiling and water-diversion systems designed to capture water passing through deck boards and route it away from the patio below. The locally owned company brings decades of high-end residential construction experience in Upstate South Carolina and serves homeowners across South Carolina, North Carolina, Georgia, and nearby areas. A properly designed system can help turn an exposed area below a deck into a more functional outdoor living space.
Why the Space Beneath a Deck Deserves a Plan
An under-deck patio is not simply a ceiling installed beneath floor joists. It is a small exterior room with its own drainage, ventilation, lighting, clearance, and traffic-flow needs. If water management is treated as an afterthought, cushions, rugs, flooring, and stored belongings may be exposed to drips, splashback, and moisture that shortens their useful life.
Start by deciding how the space will be used. A dining area needs a clear path from the house and room for chairs. A lounge benefits from comfortable seating, low-glare lighting, and airflow. Storage needs dry flooring and convenient access. Defining the purpose early makes later design decisions much easier.
Start With a Site Check
Before choosing panels, gutters, or colors, inspect the deck and the ground beneath it. Measure the deck’s width, length, and height from the patio surface to the lowest framing members. Finished ceiling panels, lighting, and fans will reduce usable headroom, so measure the final clearance you expect to have, not only the existing open space.
- Look for standing water, soil erosion, wet foundation areas, and low spots near posts.
- Inspect visible framing, stairs, posts, fasteners, and the ledger area for rot, stains, loose connections, mold, or insect damage.
- Watch where rainwater falls through the deck and where runoff naturally moves across the yard.
- Note obstacles such as utility equipment, basement doors, walkways, retaining walls, and neighboring property lines.
Any structural repair should be completed before a drainage ceiling is installed. Covering damaged framing may make later inspections and repairs more difficult.
Plan for Rain Before Choosing Finishes
An under-deck drainage system should collect water from the deck surface above, guide it toward a gutter or channel, and discharge it at a controlled location away from the house. The EPA National Stormwater Calculator can help homeowners consider site runoff, soil conditions, and rainfall when evaluating broader drainage options around a property.
Common approaches include:
- Trough systems: Individual channels installed between joists to catch and direct water.
- Panel systems: Finished ceiling panels that also divert water toward an integrated gutter.
- Membrane systems: Flexible materials placed above or below framing, depending on the design.
- Custom-fabricated systems: Built to accommodate unusual deck shapes, multiple levels, angles, or detailed trim requirements.
Whichever approach is selected, plan for flashing, sealed transitions, gutters, downspouts, and accessible cleaning points. Never direct concentrated runoff toward the foundation, a sidewalk where it may create a slipping hazard, or a neighboring lot.
Choose a System That Fits the Existing Deck
Deck height, joist spacing, slope, age, and shape all affect the best drainage solution. A simple rectangular deck with accessible framing may suit a standard system. A multi-level deck, curved edge, angled staircase, or low-clearance patio may require a more tailored design. Confirm that the final system preserves access to important fasteners, utility connections, and drainage outlets.
It is also important to distinguish between keeping the patio below drier and correcting problems on the deck above. Loose boards, failed flashing, deteriorated structural members, and poor grading should not be ignored simply because a new ceiling will be installed beneath them.
Use Local Weather to Guide the Design
Regional conditions influence material choice and drainage capacity. Homeowners can review NOAA U.S. Climate Normals to understand typical precipitation and temperature patterns near their location. In the Southeast, frequent summer storms, humidity, wind-driven rain, and occasional freeze-thaw conditions all deserve consideration.
Select moisture-resistant materials that withstand heat and repeated outdoor exposure. Make sure the water outlet can handle heavy downpours, and avoid creating enclosed corners where humid air can linger. Light-colored ceiling finishes can also make a shaded patio feel brighter and more open.
Check Headroom, Light, and Airflow
A beautiful ceiling is less useful if the space feels cramped. Keep doors, stairs, grills, and furniture from narrowing primary walkways. Plan lighting before the ceiling is closed so wiring routes, fixture locations, and switch placement are practical. Recessed or surface-mounted fixtures should be rated for the location and installed in accordance with local requirements.
Airflow matters as much as appearance. Leave room for cross-ventilation, especially in humid climates. Ceiling fans can improve comfort, but only after confirming adequate blade clearance, suitable electrical protection, and mounting support.
Pick Materials for the Way the Patio Will Be Used
Aluminum, vinyl, composite, treated wood, and other ceiling materials each offer different looks, maintenance needs, and levels of durability. Choose a finish that is easy to clean and unlikely to show every water mark or pollen stain. For the floor, concrete and pavers are practical choices when drainage is well managed, while outdoor rugs should dry quickly and be lifted periodically for cleaning.
Use weather-resistant seating, cushions, storage cabinets, and lighting. Indoor furnishings may deteriorate rapidly outdoors, even beneath a drainage ceiling, because humidity, windblown moisture, and temperature swings remain part of the environment.
Decide How the Space Will Function
- Outdoor lounge: Arrange seating around a coffee table with warm lighting and a fan.
- Dining area: Leave enough room to pull out chairs and maintain a clear route to the grill or door.
- Quiet retreat: Add plants, privacy screens, comfortable chairs, and soft task lighting.
- Dry storage: Use elevated, weather-resistant cabinets for tools, bicycles, or seasonal items.
- Family activity space: Favor flexible furniture and easy-clean flooring for games and gatherings.
Avoid Common Under-Deck Planning Mistakes
- Installing a drainage ceiling before repairing damaged deck framing.
- Ignoring low headroom until after panels, lights, or fans are installed.
- Routing water toward the foundation or an unsuitable discharge area.
- Sealing the patio too tightly and trapping humid air.
- Using indoor rugs, furniture, paint, or fixtures outdoors.
- Forgetting access for gutter cleaning, inspections, and repairs.
- Adding grills, fire features, or heaters without verifying required clearances.
Common Questions Homeowners Ask
Can every raised deck support a dry patio below?
Many can, but the deck’s condition, height, drainage path, framing access, and water outlet should be reviewed first.
How dry will the area stay in a heavy storm?
Performance depends on the system design, installation quality, deck condition, wind-driven rain, and maintenance. Inspect the area after severe weather and clear debris from gutters and outlets.
What maintenance is required?
At least once a year, clean leaves from gutters and outlets, check seams and fasteners, look for stains or drips, and inspect visible deck structure for developing problems.
Build the Plan Around Water First
A comfortable under-deck patio begins with sound framing and a dependable drainage system. Once drainage, discharge, clearance, ventilation, and electrical needs are addressed, homeowners can confidently add flooring, lighting, furniture, and personal touches that make the space useful throughout more of the year.